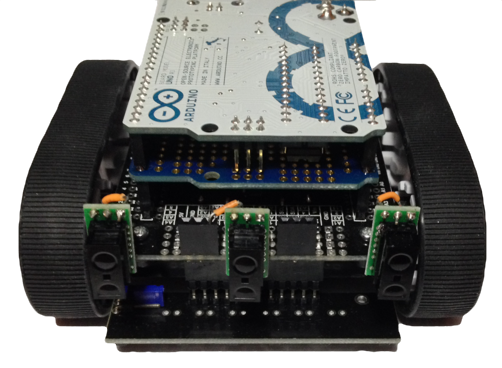
 CurioDuino (Photo credit: David Keck)
In the last post I talked about learning to code in Arduino. This time I would like to talk about hardware. The pieces of hardware that I will be using have already been listed in the previous segment, but I will list them again here.
Note: The Adafruit EZ Link Shield is only being used for communication currently because the board does not work well for reprogramming across bluetooth yet. (But, Adafruit is still working on it!)
EDIT (4/19/14): Adafruit has fixed their EZ-link!
For reference, here’s a pdf of the Uno board with all of the pins that are in use.
Let’s put CurioDuino together.
The first step is to purchase the ZumoBot chassis and assemble it, along with the Zumo Sensor Array from Pololu. If you read the above pdf carefully, you would notice that is necessary to cut traces between the four inside sensors of the array. Pololu shows how to accomplish this near the bottom of this page: https://www.pololu.com/docs/0J57/2.c
The next step is to get three of the 5cm obstacle sensors listed above. These will be put into place by soldering using 3 of the 3-pin female adapters into the front expansion of the ZumoShield. The pins that are used for these are listed in the pdf above. There may some confusion with this step. It is truly up to the builder to decide how these sensors will be attached. As long as the data pin is connected to the correct pin shown above, all the code will work correctly. I used a combination of right-angle pins and wire to attach these sensors to the front of CurioDuino.
Once these are in place, slide the the Adafruit Bluefruit EZ Link shield with stacking headers into the pins of the ZumoShield. Lastly, place the the Arduino Uno on top of the EZ Link. At this point, you have a fully assembled CurioDuino. All that is left is to upload the code to the Uno. Before doing this, ensure that the switch on the front of the EZ-link shield is set to “soft serial”.
All of the code is now available: https://github.com/davidskeck
There are three repositories (which all begin with CurioDuino) which contain everything, including the GUI. Before running the GUI, ensure that the constant titled PORT_NUMBER is set to the appropriate port for your project. Note that this project does not require bluetooth, but most cable solutions will limit the function of CurioDuino.
The next entry will focus on the software itself and the Real-Time operating system that it runs in.
Thank you for reading!